 welcome
bien venido
welcome
bien venido
nota: yo no soy el autor de estos setings son coleccion del web ajustar a su propia responsabilidad disfruten
note: I'm not the autor of this settings is a collection from the web adjust to your own responsability enjoy it
73s de W7AGR
ay lugares para ayar informacion en la web www.nu9n.com www.wz5q.net www.n7cal.com www.w3oz.com y muchos mas
MIC2200
Settings:
LEFT CHANNEL:
1) Set the “+48 V” IN, the light is “ON” (this supplies power to the microphone)
2) Set the “MIC/LINE” pushbutton IN, the light is “ON” (this turns on the MIC mode for the XLR)
3) Turn the “MIC GAIN” Control to the 9:00 o’clock position (this is just a starting point)
4) Set the “PHASE REV.” pushbutton OUT, Light is “OFF” (don’t need this)
5) Turn the Low Cut “Hz Frequency” Control to the 12:00 o’clock position (won’t be using this)
6) Set the “LO CUT” pushbutton OUT, Light is “OFF” (don’t need this)
7) Turn the EQ “Hz Frequency” Control to the 12:00 o’clock position (won’t be using this either) Set the “x 10”
pushbutton OUT, Light is “OFF” (don’t need this)
9) Set the “x 0.1” pushbutton
OUT, Light is “OFF” (don’t need this)
10) Turn the “Octave Bandwidth” Control to the 12:00 o’clock position (don’t need this)
11) Turn the “db Level” Control to the 12:00 o’clock position (don’t need this)
12) Set the “EQ IN/OUT” pushbutton OUT, Light is “OFF” (don’t need this)
13) Turn the “db Output” Control to the 0db, 12:00 o’clock position (this is just a starting point)
You will notice that there are allot of features not being used on this unit.
Most of what is not being used here will be taken care of with the EQ.
one channel settings mdx 2200

Settings;
- Buttons Pressed in are RELEASE, SC FILTER, IN/OUT
|
Threshold |
-35 |
|
Ratio |
3 |
|
Threshold |
-5 |
|
Ratio |
2,5 |
|
Attack |
50 |
|
Release |
0,25 |
|
Output |
0 |
|
Treshold |
+12 |
2 channel settings for mdx 2200
LEFT CHANNEL: to drive the chain
Expander/Gate Settings:
1) Turn the “THRESHOLD” Control to “OFF”, Full CCW. (We will set this later)
2) Set the “RELEASE” pushbutton IN, Light is “ON” (This will make for a SLOW release)
3) Turn the “RATIO” Control to “2.5”, 12:00 o’clock. (Good starting point)
Compressor/Limiter Settings:
1) Set the “SC EXT” pushbutton OUT, the light is “OFF”. (Not Used)
2) Set the “SC MON” pushbutton OUT, the light is “OFF”. (Not Used)
3) Turn the “THRESHOLD” Control all the way to the RIGHT, Clockwise. (This will deactivate the compressor as you will not be using it on the Left Channel)
4) Set the “INTERACTIVE” pushbutton OUT, the light is “OFF”. (Not Used)
5) Set the “SC FILTER” pushbutton OUT, the light is “OFF”. (Not Used)
6) Turn the “RATIO” Control all the way to the LEFT, CCW. (This will deactivate the compressor as You will not be using it on the Left Channel)
7) Turn the “ATTACK” Control all the way to the RIGHT, Clockwise. (This will deactivate the compressor, as you will not be using it on the Left Channel)
Set the “AUTO” pushbutton OUT, the light is “OFF”. (Not Used)
9) Turn the “RELEASE” Control
all the way to the LEFT, Counter-Clockwise. (This will deactivate the compressor as You will not be using it on the Left Channel)
10) Turn the “OUTPUT” Control to the “0” position, 12:00. (This will be adjusted later to get the correct Input gain on the EQ)
11) Set the “I/O METER” pushbutton OUT, the light is “OFF”. (Just for now)
12) Set the “IN/OUT” pushbutton IN, the light is “ON”. (This will engage this channel)
Peak Limiter Settings:
Turn the “LIMITER” Control all the way to the RIGHT, “OFF”.
(This will deactivate the Peak Limiter, as you will not be using it)
Coupler Settings:
Set the “COUPLE” pushbutton OUT, the light is “OFF”. (Not Used)
RIGHT CHANNEL: to drive the dsp 2024
Expander/Gate Settings:
1) Turn the “THRESHOLD” Control to “OFF”. (Not Used)
2) Set the “RELEASE” pushbutton OUT, the light is “OFF” (Not Used)
3) Turn the “RATIO” Control to “1”, CCW. (Not Used)
Compressor/Limiter Settings:
1) Set the “SC EXT” pushbutton OUT, the light is “OFF”. (Not Used)
2) Set the “SC MON” pushbutton OUT, the light is “OFF”. (Not Used)
3) Turn the “THRESHOLD” Control to “0”, about 2:00. (This will be the Starting point)
4) Set the “INTERACTIVE” pushbutton IN, the light is “ON”. (This will give a very nice smooth and transparent compression)
5) Set the “SC FILTER” pushbutton OUT, the light is “OFF”. (Not Used)
6) Turn the “RATIO” Control to “3:1”, about the 10 O’clock position. (This will be the best ratio to start with)
7) Turn the “ATTACK” Control all the way to the LEFT, Counter-Clockwise. (This will make the attack very quick) Set the “AUTO” pushbutton OUT, the light is “OFF”. (Not Used)
9) Turn the “RELEASE” Control
to about the 1:00 o’clock position. (This will give the release a slightly slow recovery)
10) Turn the “OUTPUT” Control to the “0” position. (This will be adjusted later to get the correct Input gain on the DSP2024P)
13) Set the “I/O METER” pushbutton OUT, the light is “OFF”. (Just for now)
14) Set the “IN/OUT” pushbutton IN, the light is “ON”. (This will engage this channel)
Peak Limiter Settings:
Turn the “LIMITER” Control all the way to the RIGHT, “OFF”.
(This will deactivate the Peak Limiter, as you will not be using it)
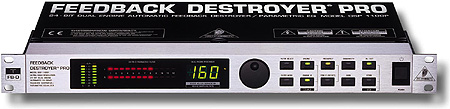
audio adjustment for deq2496 just starting points
We'll give you the following settings for a basic starting point.
It should sound good when it is in there,
This is almost impossible to do without actually hearing it over the air.
We'll give you the settings in Frequency, Bandwidth then Gain.
////here is my configuration at this time /////
////estas son mis configuraciones ahora/////
i'm not using any other settings just the peq I reset the deq2496 (press and hold the "COMPARE" and "MEMORY" buttons
simultaneously while turning ON the DEQ2496)
peq settings: for some one else migth be different
Frequency = 90 hz
Bandwidth = 3/4 octave
Gain = +4
Frequency = 160 hz
Bandwidth = 1/4
Gain = -15
Frequency = 320 hz
Bandwidth = 3/4
Gain = -3
Frequency = 520 hz
Bandwidth = 3/4
Gain = -6
Frequency = 900 hz
Bandwidth = 3/4
Gain = -4
Frequency = 1.8 kc
Bandwidth = 1/2
Gain = -6
Frequency = 3.2kc
Bandwidth = 1/2
Gain = +4
Frequency = 4kc
Bandwidth = 1/2
Gain = +8
Give these a try and see how it sounds.
If you have a real bassy voice then you might have to reduce the 90 hz frequency to 80 hz or 70 hz and perhaps reduce the gain.
If you have allot of midrange in your voice, then you might have to reduce the 320 hz or 520 hz Filters some more in gain.
The Highs will be the hardest to set. You want to push enough to get some brilliance and clarity, but without having a Compressor, you won't be able to push allot of them with out "Tearing" on
sibulance.
The secret here is to keep the bandwidth narrow, and just adjust the gains.
The Frequencies should be perfect for you on the highs.
The 1.8kc filter is for Brittleness reduction.
It should be good is set up as shown.
The 160 hz filter is for boomyness and boxiness.
It should also be good as shown, if your voice Fundamentals are from 100 hz to 200 hz, maybe reduce the gain another -5db to a total of -20db.
Also, as We don't know your voice, Watch the 900 hz filter. If it sounds too Nasally, then reduce this filter gain to 0 and see if it goes away.....if it helps then reduce it to
-4db.
good luck and the practice is the best teacher in the world 73s W7AGR
 estos
settings estan en el web de
estos
settings estan en el web de
Filter #1: Bass
Fine Tune: Adjust for what is most effective through your TX filters)
ex3200 settings
SETTINGS:
1) You will have a Balanced Cable coming into the Input of Channel 1 using the typical TRS 1/4" connector or XLR connector utilizing the 3ea wires
(Signal +, Signal -, and Shield)
2) The Output of Channel 1 going into the Input of Channel 2 will be using an Unbalanced Cable with the Mono 1/4" connector utilizing 2ea wires (Signal +, and Shield).
(You can use TRS 1/4" connectors for this if you short the Signal - and the Shield together on both ends of the cable. Doing this makes it an Unbalanced Connector)
3) You will have a Balanced Cable going out of the Output of Channel 2 using the typical TRS 1/4" connector or XLR connector utilizing the 3ea wires (Signal +, Signal -, and Shield)
Just
another note:
If you were using Unbalanced Cables coming into the Input of Channel 1 and going out of the Output of Channel 2, then you would use the opposite Balanced Cable to tie Channels 1 and 2
together.
SETTINGS:
Try these settings to start out with, as we do not know your Audio line up. Also the best place that we found to put the EX3200, is in between the EQ
and the Compressor.
Channel 1:
|
SHIFT |
= Set to Ultra Low (Light on) |
|
BASS PROCESSOR |
= Set to "1" |
|
MODE |
= Set to Soft (light off) |
|
AUTO NR |
= Set to IN (Light on) |
|
NR SENSITIVITY |
= Set to where the LED Display just barely goes to full scale on voice peaks |
|
TUNE |
= Set to 3.3 |
|
PROCESS |
= Set to Exciter |
|
HIGH MIX |
= Set to "1" (be careful with this as it will introduce "Tearing" into the audio if set to high) |
|
SOLO |
= Set to Off (Light is out) |
|
IN |
= Set to IN (Light is on) |
|
SURROUND |
= Set to IN (Light is on) |
|
SURROUND |
= Control set to "1-2" |
Channel 2:
|
SHIFT |
= Set to Ultra Low (Light on) |
|
BASS PROCESSOR |
= Set to "2" |
|
MODE |
= Set to Soft (light off) |
|
AUTO NR |
= Set to IN (Light on) |
|
NR SENSITIVITY |
= Set to where the LED Display just barely goes to full scale on voice peaks |
|
TUNE |
= Set to 5 |
|
PROCESS |
= Set to Enhancer |
|
HIGH MIX |
= Set to "1" (be careful with this as it will introduce "Tearing" into the audio if set to high) |
|
SOLO |
= Set to Off (Light is out) |
|
IN |
= Set to IN (Light is on) |
You will hear a phenomenal increase in Sub Harmonic Low end and Brilliant Clarity in the rest of the Frequency Response.
You might have to reduce the boost on the low end with the EQ and use the Bass Processor Controls on the EX3200 to increase the Harmonic content of the Low End.
The last thing to adjust will be the Compressor, which will smooth out the whole effect.
One Word of Warning.......
You have to have some Low End in your Voice and have a Mic able to pick up that Low End to give the Sub Harmonic Processor something to work with. Most everyone that has badmouthed the EX3200 has
had a High Squeaky Voice

|
Effect |
- PLATING (Shows "PLAT" on display) |
|
Edit A |
- PRE.D = 0.010 |
|
Edit B |
- DECA = 2.358 |
|
Edit C |
- DAMP = 10 |
|
Edit D |
- SIZE = 33 |
|
Edit E |
- SHV.D = 32 |
|
Edit F |
- DIFF = 20 |
|
EQ LOW |
- BASS = -10 |
|
EQ HI |
- TREB = +16 |
|
MIDI |
- OFF |
|
INPUT |
- STER |
|
OUTPUT |
- INTN |
|
CONFIG |
- PARA |
|
MIX |
- usually around 8-15 using a single channel. Both Channels are used here (one going into the other) so ours is set at 3. |
suerte se requiere incontable horas de practica para ayar el setting que se busca todos los settings son un comienso o te pone cerca de tu meta de ahi se busca el audio todo depende del mic, voz, radio, paciensia que se nesesita muchisima 73s
W7AGR